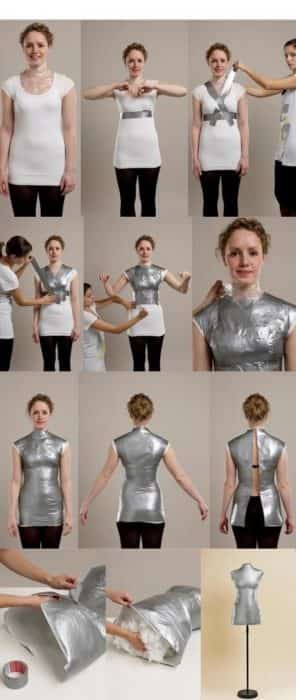
Knowing about dress form is absolutely essential for every person who tailors dresses. It lays down the basic measurement work for the dress that has to be made and makes the process really easy. If you also want to work on making dresses or you already make them but do not have a dress form, you have come to the right place. Right now, we are going to take you through the steps of making a really easy and cost effective dress form for your tailoring ease.
[publishpress_authors_box layout='ppma_boxes_188121']
What Is a Dress Form?
Before getting to know how to make one of these, let’s get to know the primary things about a dress form. It is basically a three-dimensional torso or model of the person’s body whose dress has to be sewn. It helps the dress maker in getting each measurement perfect and also assists in making alterations.

Dress forms can be used to make any clothing item including bottoms and undergarments. Dress forms were initially made to avoid the boring two dimensional look of dresses on a hanger. To showcase how the dress will look on real human body, this piece of art was constructed.
Attack on Titan Eren Jaeger Cosplay Coat
€172,95 – €199,95 incl. MwStIn early times, a dress form was commonly made with foam or cloth, but as the time changed, easier materials became commonly used for them.
In this guide, we are going to tell you how to make a dress form with duct tape. Not only is it easy to make, but it is also super cheap and durable. The flexible duct tape makes it easier to get each measurement accurate. So let’s get started without any further ado!

Step 1: Gather the Required Supplies
To make a duct tape dress form, you will need following things:
Mermaid bikinis set for girls
€43,99 – €73,99 incl. MwSt- An old close fitting t-shirt or the cloth which you want to sew. Use such item which you are able to cut.
- Duct tape
- Scissors
- Cling film
- Old newspaper or poly batting
- Card board
Wear the t-shirt or whatever you have picked up as the base of the dress form to stick on.
Step 2: Get a Helping Hand
Making a dress form with duct tape is not possible alone. Thereby, we recommend that you get a helping hand. To get the curves, fitting, and measurements right, it is important to have someone help you out.
Step 3: Get Started with the Curves
Make sure you use a good quality duct tape that sticks on the fabric you are wearing properly. To form the curves, follow the steps given below:
- Start taping on the waist line. Tape around your waist twice and secure the tape in place.
- Now place the tape in the exact middle of the waist line tape and take it all the way back through your shoulder and stick on the back.
- Repeat this for both shoulders starting from the front middle till back middle.
- After following the steps above, tape away the curves once or twice more to make it more solid and durable.
Step 4: Fill in the Chest Area
Once your curves are ready, start taping the area above your waist and go all the way up until the chest is covered. Again, you may layer once or twice more to strengthen the dress form.

Once you reach the neck, using cling film cover your neck and then tape over it to avoid getting duct tape stuck on your skin. It is better to tape vertically on the neck than horizontally to prevent any difficulty in breathing. We recommend that you remain very gentle and firm while taping the neck area due to sensitivity of the part.
Step 5: Tape it All Up
After getting done with the upper body, just go on and tape the lower body by taking the tape firmly around the body and taping evenly. Try to avoid air gaps and too many creases. To increase the durability, go diagonally as well as vertically.
Attack on Titan Eren Jaeger Cosplay Coat
€172,95 – €199,95 incl. MwStStep 6: Tape the Hip Area
While taping the hips, make sure to first go horizontally in circles and then vertically as well as the tape tends to separate upon stretching.
Step 7: Get Out of the Dress Form
Once you are done taping all over the body parts as much as required, it’s time to get out of it. To do so, take scissors and start cutting the dress right from the bottom middle part at the back. Cut it all the way up till neck.
After removing the dress form from your body, carefully close up the opened area back together with tape.
Mermaid bikinis set for girls
€43,99 – €73,99 incl. MwStStep 8: Filling the Dress Form

Dress forms have to be stable and firm in order to be highly effective. After closing the opened area of the form, you will have to fill up the insides of it. For this purpose, we recommend using old newspapers or poly batting. Be careful when filling up the dress form and keep compressing the shape to prevent the model from losing its measurements and firmness.
Once you have entirely filled it up, go ahead and measure the bottom opening on a card board and cut it out using scissors. Tape the card board to the bottom of dress form to close it. Secure it with duct tape for firmness.
Repeat this step for the neck opening as well.
The Legend of Zelda: Breath of the Wild Princess Zelda Cosplay Costume
€127,99 – €188,99 incl. MwStDanganronpa Celestia Ludenberg Wig Cosplay
€77,99 incl. MwStLastly, you can take an old lamp stand or some other rod stand to fit your dress form on. Doing so will really help you in making dresses with ultimate precision and reduce the alteration hassle.
Summing Up
Using duct tape to make a dress form is not only affordable but also very convenient. It is easy to make, stick, and get measurements right. Duct tape is very durable, so one dress form can be used for a long time unless the measurements need to be changed.
Discover Your Perfect Cosplay Match: Unveiling the Ultimate Guide to Finding the Ideal Costume for You
2. April 2024
The article discusses the importance of personal style and fashion preferences in cosplay, as well as the factors that influence them, such as favorite colors, fashion trends, cultural influences, and body type. It also highlights the joy that cosplayers find in portraying specific characters or genres that they have a personal connection with.
0 Comments11 Minutes
Unleash Your Creativity with These Captivating Cosplay Photo Ideas for Stunning Shots
31. March 2024
Popular Cosplay Photo Ideas for Beginners
This article provides beginners with popular cosplay photo ideas, such as character portraits, action shots, and group cosplay photos, along with tips on how to capture stunning images.
0 Comments17 Minutes
Unleash the Halloween Heroes: A Guide to Hiring Cosplayers for Your Spooky Event
31. March 2024
Halloween cosplayers are essential in creating an immersive and exciting atmosphere at spooky events, engaging with attendees and generating buzz on social media, while enhancing the overall experience and ambiance of the event.
0 Comments26 Minutes
Unleashing Unforgettable Experiences: Harnessing the Impact of Walk Acts in Event Entertainment
31. March 2024
Walk acts, also known as roaming characters or strolling performers, are becoming increasingly popular in event entertainment due to their ability to engage and captivate audiences by interacting directly with attendees, creating memorable moments and leaving a lasting impression.
0 Comments27 Minutes


